Wednesday, March 30, 2016

Charity Painting For Cop Week:

Update- Pictures added April 6,  6:01 PM

It's that time again.  The cops down at the LGBT Fallen Cops group are having their annual Cop Week thing again and I've been asked to donate another painting for their Silent Auction.  And I always do something animal themed, and something cop themed. Well, last year I focused on the fallen Firefighters but it's all relative. 

The year before that it was both Cops and Firefighters.


 This year, I'm going Cop theme again.  
I'm doing a police horse with a police K9.

So I'll add the new pictures to the bottom as I go. I keep forgetting how I do it.  If I put the newer pictures at the top or the bottom.  I'll add them to the bottom so that way when you scroll down the progress doesn't look backwards. And as always I'll edit this single post when I add new images. I will change the date at the top of the post so people know there's new updated pictures added below.


I'm at a stopping point right now.  It always looks like a deranged water color when I first start them, but it'll improve as I go.  They always do. This is just the base coloring.  I added more and more shading, antiquing, washes, highlights, and details as I go layer by layer.

New Pictures Below.


Ok another update. Boy, it's really hard to get good quality photographs of the progress.


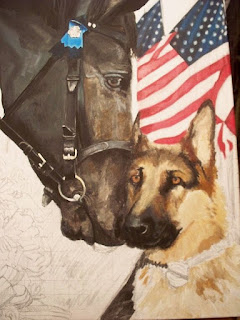
I'm sorry, these progress shots really suck.  I think it's the lighting in the room I'm painting in.  I have a lamp shining directly on the canvas and everytime I take a picture of it, I set it down in a chair that's directly across from the chair I'm sitting in painting with the lamp behind me shining on it. I opted not to use the flash because it's picking up little speckles from the texture of the canvas and the images don't look as good when I do so I'm doing it without the flash and it's just all blurry.  I think I just don't have the lamp positioned right, but I just didn't want to have to get up and remove the lamp, and put it in another area just to take progress pictures.  I'd be up and down and up and down every five minutes.  So here is a picture of how it looks in a little bit better lighting.  This is how it really looks so far.


Back at it.  Here are some more updated pictures.
Still have a long way to go yet.


New updates.
 Almost Done.


Finally finished.  The pictures were hard to take but here are some shots of it completed.


Tuesday, March 29, 2016

Vallejo Pigments-Pastels Review:


This is the first time I think I've done a review of some of the brands of supplies I use.  I hope to put some more reviews up on different things.  I do have another review I want to do involving Apoxie Sculpt as well, but for now.  Vallejo Pigments.

I use both Pastels and Acrylics on my models for the paint jobs.  I've used in the past, sets of Pastels you can find at Michael's Craft store.  I've used the box of greys and blacks in the sticks.  Normally crushing them up into a small container.  I've also purchased the multi-color box of stick pastels like that and only used the few oranges and browns.  Waste of about $12 bucks considering I normally don't touch the blues, greens etc in the set.   So I then purchased some Pan Pastels.  

I used those for a while, and I really do like the Pan Pastels brand for the Sienna and Umbers.  I've used the flesh pink, and the yellows.  I think I've bought a lot of the natural warm tones in that brand. The price was a little much for what little you get in the pots they come in.  I think at the time I paid $4.99 each for them plus shipping. That's a bit much considering it's packaged like a compact of blush or powdered facial foundation makeup.  It doesn't go far.
  
Earth Pigments were the next brand I tried.  I bought a couple of yellow tones, and a brown oxide type color.  I also bought a bag of some type of sienna color.  It's like red orange dust and it gets all over everything when I'm pasteling a horse.  I notice with the Earth Pigments that they don't cover as well as Pan Pastels.  The E P's do have a slightly stronger earthy dust smell to them also. With regards to the coverage of the EPs, I do have to do more layers when pasteling.  The Pan Pastels do cover more brilliantly and are very strong in coverage. The Earth Pigments, you have to do more coats to get the color to darken. 

Now, onto Vallejo pigments. I just tried this brand recently and I haven't been more impressed.  I was mostly shocked at the full coverage of the white.  I've only bought I think three bottles of this product, a sienna color, an umber tone, and the solid white.  These are commonly used by model train enthusiasts.  They use the pastels to shade and weather rail cars, military vehicles and things of that nature.  But these colors work brilliantly.  The amount you get may seem like a small amount but the coverage I've found liken that of Pan pastels if not more vibrant.  You really don't need very much.  I also love the fact that they come in a jar packaged powder form.  You don't have to crush them up, leaving the chance of a small pebble-speck  getting caught in your brush bristles and streaking a line mark across your horse's body you have to buff out with a dry q-tip all before having a massive coronary. 
But what I'm most impressed with is something I had little faith would do much good to me in the first place.  The white color.  I normally use a white stick pastel that i crush up and use to dilute the other pigments down to fade out the vibrancy of the horse's coat. I use it to also correct any mistakes where a certain color just didn't blend as well as I'd hoped.  but I've never depended on white pastel to be any type of a color cover, or do anything to really change the color of a model when applied. Those of you who have ever applied white pastel to something, know that as soon as you spray it, it disappears. It really doesn't do anything to the color once sprayed.  It just helps to blend, and even then it does a poor job of it.  White just works as a dilute to soften other colors and blend. Not the Vallejo white pigment.  This stuff covered and coats.  Now, it wont lighten a chestnut to a lighter chestnut or turn a dark golden palomino into a buttermilk palomino. That's not realistic.  But what it does, is it works to soften the white on a grey horse.  I also helps to sink appaloosa spots and fleabitten speckles. Anytime you've done a paint horse or had a horse with a lot of white areas, no matter what they just don't look even and clean enough.  After the white is all finished, spread a coat of Vallejo white pigment over the white and then spray it.  It hides any marks your figures may have left, if there is any areas where the white just didn't look opaque enough.  The white powder does set it.  I've also lightened a dapple grey's socked where the white meets the grey. The powdered Vallejo pigment acts as an airbrushed fade from color to white when working with the greys.  I used the Vallejo pigment white over top of the Arabian I just completed called "Aladdin Sane".  I covered him in fleabitten chestnut speckles. I didn't like how sharp and loud they were. They needed to be softer.  If I had put any other brand of pastel I've used in the past over top of his speckles and spray sealed it,  it would have been like I put nothing there.  But the Vallejo white actually opaqued the spots and speckles down and faded them a lot. It covered and made them look as though they were sunken into the horse's coat like a true appy has.  I used the Vallejo white pigment to form halo's around the appaloosa's spots. You start off with white acrylic for a base, then scrub in an appy spot. Spray that to seal it. Then dust over with the Vallejo white, and respray.  You may have to do it a couple of times til you get the desired amount of opacity depending on how dark your appy spot is, but it makes the spot go down into the skin of the horse. Then scrub in the final top coat of color on the appy spot leaving the halo around it.  I never knew a white pigment would actually brighten and whiten up a subject.  So I recommend the Vallejo pigments.  You can find them at a number of craft stores, hobby stores, and a lot of train hobby places will carry them or probably can order them for you.  I found mine on Ebay for around $3.00 and some change per bottle plus shipping.  They were very affordable.  Just look for those sellers with the best deals. Some may have free shipping and most of them do combine shipping so that helps.  I may add to this entry again and add a sample picture of how the pigment covers darker color and give a better example.  I for one am going to acquire more of this brand of pigments in the future.
"Aladdin Sane" was painted using Vallejo white mixed with black for his greys, and his chestnut flea-bitten speckles were also done in Valljo brand sienna color.


Monday, March 28, 2016

"Aladdin Sane" Completed:

He's done and will be up for offers tonight.  The batteries in my digital camera went dead while I was taking his pictures so I didn't get to take all angles but I got several really nice shots of him.  I really like how he turned out.  His name "Aladdin Sane" is in memorial to David Bowie. My mom's icon and mine too. He's got thousands of tiny little deep chestnut flea bit ticking all over his entire body.  Then he also has faint dappling in there too.  He's got polished hooves, and flesh pink on his nose.  His mane and tail are white with antiquing.  He's a Peter Stone Arabian with a resin Arabian head.  I don't know who did the head sculpt, but the heads were sold separately several years ago. More pictures coming soon.
Starting Offer $290.00
Email to submit offers.  
luvje0rdie@aol.com 
(spelled with a zero)